Follow this WordPress Theme Tutorial Series from the beginning.
You’re almost done. Hang on for just one more lesson. Today, you take on the life of all blogs; the comments template. In my opinion, a blog is not a blog if it doesn’t allow readers to comment. To some, comments are not important, but it’s strange for me to imagine blogs without them.
You should know:
- There’s no right way to set up the comments template in comments.php.
- Most WordPress designers use the default comments template from the WordPress Default Theme, Kubrick.
- Some designers modify the default comments template to suit their needs.
- You will use my modified version of the default comments template.
Step 1
- Create a new file: comments.php.
- Copy my comments.txt file to your comments.php.
- Save comments.php.
Step 2
- Copy my comments-template-css file to your style.css.
- Place it at the end of style.css or right above #footer.
Step 3
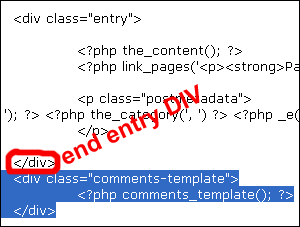
Type this under the entry DIV, in the single.php file:
<div class=”comments-template”>
<?php comments_template(); ?>
</div>

The comments_template() function is what calls for the comments template from the comments.php file. The comments.php file then follow its template (or codes) to display the comments listing. Each item in the listing is a comment.
You can also use the comments_template() function in the page.php file to allow people to comment on them too. Whether to do that is up to you. If you like, repeat step 3 for page.php.
Step 4
Step four is validate, validate, and validate your codes some more. However, there is no step four because you’re using my cleaned-up and modified version of the default comments template. I’ve validated the codes for you.
To validate offline:
- Go to View > Page Source or Source.
- Copy all the source codes.
- Go to the validator.
- Paste your codes in the Direct Input box.
- Click Check.
For future reference (when you build your own theme and comments template), here are the pages to validate:
- Homepage
- Archive pages
- Category pages (if you customize category pages)
- Search result pages
- Pages (i.e: About)
- Single post view page
- Single post with no comments
- Single post with comments
- Single post with must login message
- Single post with no login required message
- Password protected single post with comments
Further Comments Template Explanations
- The comments template is basically one Ordered List (OL), not unordered. Although, they basically work the same way. Unordered is organized by bullet listing. Ordered is organized by number listing (each item has a number, starting from one).
- In the single.php file, you wrapped the comments-template DIV around comments_template(). Now, your comments template is an ordered list within a DIV.
When you password protect your post, your comments option is also password protected:

The modified version of comments template that you’re using has an H2 sub-heading that says Password Protected. The default comments template doesn’t have that.
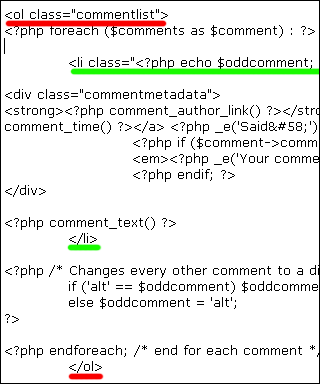
Here’s what makes up the comments listing:

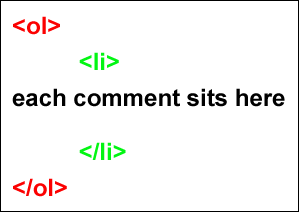
And here’s what that actually means:

The comment_text() function is what calls for each comment.
I will not explain what the CSS codes for the comments template mean. Unlike the codes in the comments.php file, you can actually play with the CSS codes without breaking the comments template. They’ll do you more good if you play with them instead of reading an explanation from me.
And guess what? There’s no lesson review, today. You’re done.
The initial batch of lessons for this tutorial series is complete. Future lessons will cover more advanced design and styling techniques.
thanks
Hey Hi,
Thanks for sharing such informative and step by step procedure for comments template lesson.
So brilliant.
Thank you:P