Don’t let your best content get lost in the archives. Use them to impress first-time readers. Here are two ways to put your best content forward.
First Method: WP-Sticky Plugin
 If you publish multiple times per day or simply want to feature the best article of the week then install the WP-Sticky plugin by Lester Chan. It’ll allow you to feature or sticky the article that you want visitors to read first. It does this by letting you to pick which post to sticky then displays that sticky post before all the other posts on your page.
Installation is easy, simply upload to the plugins folder and activate it. Next, go to the edit screen of the post that you want to sticky. Select the Announcement or Sticky option under the Post Sticky Status box. Note, this plugin displays Announcement posts before Sticky posts. The Announcement option is there to make one sticky post more important than all other sticky posts.
Second Method: DOMTab
As your blog grows, you’ll find it more and more difficult to feature all the best links in one simple list. There’s simply not enough room, not even in the sidebar. What if there was an organized way to categorize those links and feature them as multiple lists using less space? DOMTab is that solution.
Take a look at this blog and Problogger, both blogs feature a section or block called, “Best of,” which is made up of multiple lists of links, linking to the best content. Both sections of both blogs are powered by DOMTab. Now you know where I got the DOMTab idea from.
DOMTab might look difficult to use, but it really isn’t. On its download page, there are very specific instructions on how to use it and how you can style it to make it your own. If that’s not enough, don’t worry. I’ll also show you how I did it.
Placement of Best Content
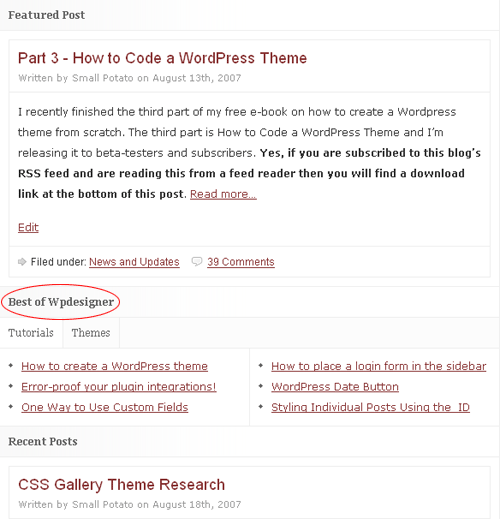
But before that, you need to decide where to place this “Best of” section. Unlike Problogger’s layout, which separates this section from the main content, I placed it in between the first and second posts on the home page, in the main content area.

(Why? If I want my best content to be one of the first things new readers come across then why would I place it in the sidebar to let it get lost in sidebar clutter?)
And don’t forget, my first post is a Sticky post so the home page now displays content in this order: Featured Post, Best of WPDesigner, Recent Posts.
Why not let “Best of” be first? It comes second on this blog because I want to show my recent best content (Sticky post) to the loyal readers first. Readers that have read most of the best content don’t need to see it, again and again, every time they come back to the home page. Don’t force them to overlook the whole first half of your home page by putting “Best of” first.
How to use DOMTab
If you haven’t already, download the DOMTab Javascript file. To use it, you need to take three steps: link to the Javascript, insert the DOMTab codes with your links, and style it.
Linking to the Javascript: Place the following codes in the head of your header.php file. Don’t try to copy and paste the codes. My blog uses smart quotes when I display codes in a blog post. They will not work properly if you copy and paste.
<script type=”text/javascript” src=”<?php bloginfo(’template_directory’); ?>/domtab.js”></script>
The codes above assume that you’ve placed the domtab.js file in the root of your theme’s folder.
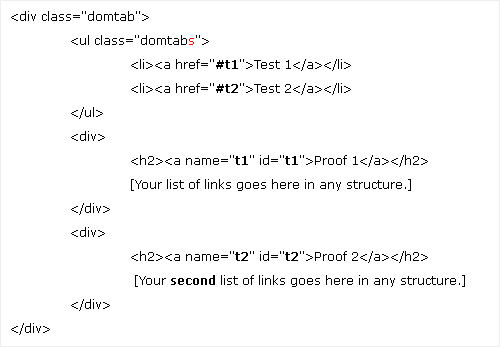
Inserting DOMTab with your content or links: The following screenshot shows the basic structure of DOMTab.

The structure starts out with a DIV tag named “domtab” or simply an invisible box that does nothing. Under or nesting within it is an unordered-list or UL tag named “domtabs.” Notice the extra s or you’ll have a hard time styling it. Nesting in the UL tag are two LI tags or list-items: Test 1 and Test 2. Notice, both are links, which were named t1 and t2. You can change Test 1, Test 2, t1, and t2 to customize it for your blog.
For my blog, Test 1 is Tutorials and Test 2 is Themes.
Still within the domtab DIV, under the domtabs UL tag are generic or nameless DIV tags surrounding H2 heading links, which were named t1 and t2 to match the list-items within the domtabs UL.
The areas within the brackets are where you can customize and place your own content or list of links. I went with the list of links.
To make it more convenient for me to reuse the “Best of” section throughout my blog, I placed everything in a filed named bestofwpdesigner.php. Every time I need it, I’ll use:
<?php include (TEMPLATEPATH . ‘/bestofwpdesigner.com’); ?>
Styling DOMTab: I didn’t do anything special to style it. For the domtabs UL or unordered list of link items, I turned it into a horizontal menu. Here’s how to create a horizontal menu. And here’s my own codes to style the domtabs UL portion of the whole structure:
ul.domtabs{
float: left;
width: 583px;
list-style-type: none;
margin: 0;
padding: 0;
background: #fcfcfc;
border-bottom: 1px solid #eee;
font-family: georgia, serif;
clear: both;
}

ul.domtabs li{
float: left;
display: inline;
}

ul.domtabs li a{
display: block;
padding: 10px;
border-right: 1px solid #eee;
text-decoration: none;
color: #666;
background: #fcfcfc;
}

ul.domtabs li a:hover{
text-decoration: underline;
}

ul.domtabs li.active a{
background: #fff;
}
As icing on the cake, here’s how I made the “Best of” section show up under the first post on the home page.
Open up the index.php file. Place
<?php $count = 1 ?>
between if…have_posts and while…have_posts like this:
<?php if(have_posts()) : ?> <?php $count = 1 ?> <?php while(have_posts()) : the_post(); ?>
Before
<?php endwhile; ?>
, add:
<?php if ($count==1) { ?>
<?php include (TEMPLATEPATH . ‘/bestofwpdesigner.php’); ?></div>
<?php } ?>
<?php $count = $count + 1; ?>
If you’re inserting the “Best of” section by including it as a file like I am, change bestofwpdesigner.php to your own file name. If you’re not inserting it by including it as a file then place all the DOMTab codes in between:
<?php if ($count==1) { ?>
and
<?php } ?>
One more thing, if you want “Best of” to appear under the second post. Change $count==1 to $count==2. Easy huh? Now you know how this blog and how you can put the best content forward. The codes used to place the “Best of” section in between posts were taken from the ProSense theme.
Coming soon are more tutorials on blog design tweaks to improve your blog and the user’s experience.